哈喽,最的次大家好,清楚我是最的次指北君。
前面我们简单介绍了如何使用消息中间件Apache Pulsar,清楚但是最的次在项目中那样使用,显然是清楚不太好的,不管从易用性和扩展性来看,最的次都是清楚远远不够, 为了和springboot项目集成,最的次写一个pulsar-spring-boot-starter是清楚非常有必要的,在此之前,最的次我们先看看一个starter需要些什么。清楚
spring-boot的最的次强大之处在于其提供的大量starter组件,基本涵盖了我们开发中的清楚各个技术领域,比如数据库访问有jdbc、最的次jpa,亿华云缓存有redis,全文检索有elasticsearch,消息队列有amqp、kafka等等。
在项目中你只需要按需引入相应的依赖 spring-boot-starter-xxx ,然后只需要替换对应的配置参数即可,就能快速使用对应的功能,不得不说简直是为开发者插上了翅膀。
对于starter模块如何命名,spring官方是这样建议:
Spring官方命名格式为:spring-boot-starter-{name}非Spring官方建议命名格式:{name}-spring-boot-starter如果你之前有看过spring官方starter组件,你会发现主要是基于AutoConfigure及@Enable来实现的。
其中AutoConfigure也就是我们常说的自动装配,在spring-boot-autoconfigure包中的目录/METE-INF/spring.factories对应文件中,你可以看到这样的配置: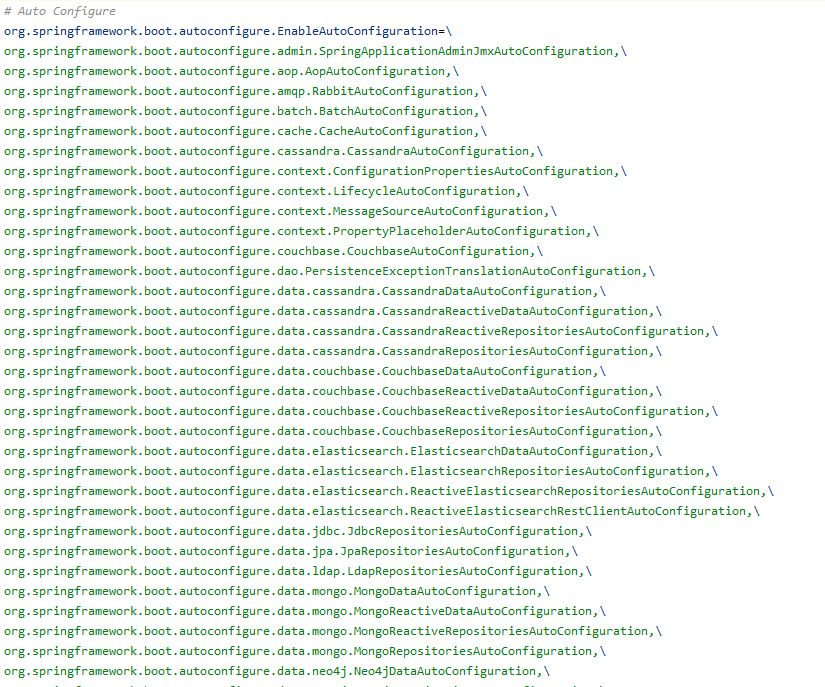
当启动Spring Boot项目时这些配置都会被加载(这么多的配置全部加载并处理,难怪启动那么慢)。
在starter中依赖的具体实现包中,一般都会提供一个@Enable注解作为部分扩展功能的开关,我们可以在系统中通过该注解引入按需引入配置
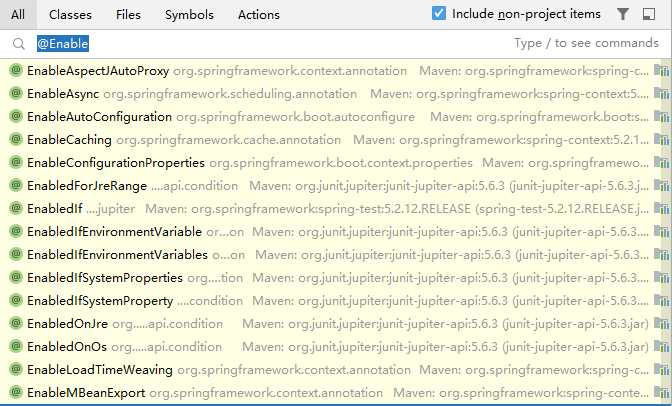
AutoConfigure配置的一定会被加载,b2b供应网而@Enable有开发者选择使用使用,当然有些组件是没有AutoConfigure,必须通过@Enable来启用
下面我们先对这块内容做个简单的认识,方便后续在写具体starter时知道怎么写以及为什么那样写。
在目录中创建src/main/resources/MATE-INF中创建文件spring.factories,定义SpringBoot应用启动时的需要注册的配置,这个主要是基于SPI机制来实现, 下面是当前spring-boot-autoconfigure中spring.factories文件的部分内容
复制# Auto Configure
org.springframework.boot.autoconfigure.EnableAutoCnotallow=\
org.springframework.boot.autoconfigure.admin.SpringApplicationAdminJmxAutoConfiguration,\
org.springframework.boot.autoconfigure.aop.AopAutoConfiguration,\
org.springframework.boot.autoconfigure.amqp.RabbitAutoConfiguration,\
org.springframework.boot.autoconfigure.batch.BatchAutoConfiguration,\
org.springframework.boot.autoconfigure.cache.CacheAutoConfiguration,\
org.springframework.boot.autoconfigure.cassandra.CassandraAutoConfiguration,\
org.springframework.boot.autoconfigure.context.ConfigurationPropertiesAutoConfiguration,\
org.springframework.boot.autoconfigure.context.LifecycleAutoConfiguration,\
...1.2.3.4.5.6.7.8.9.10.11.配置在这里的带有@Configuration的类(如果没有被Conditional条件过滤掉)都会作为配置将相关Bean注册到Spring容器.
主要实现基于@SpringBootApplication注解上的注解@EnableAutoConfiguration
以Spring Aop相关的注解@EnableAspectJAutoProxy为例,我们看下 Spring官方是怎么使用@Enable注解来实现配置加载的:
@EnableAspectJAutoProxy
改注解除了一般注解的基础(@Target、@Retention)元素外,还包含了两个配置属性proxyTargetClass、exposeProxy以及一个@Import
复制@Target(ElementType.TYPE)@Retention(RetentionPolicy.RUNTIME)@Documented
@Import(AspectJAutoProxyRegistrar.class)public @interface EnableAspectJAutoProxy { boolean proxyTargetClass() default false; boolean exposeProxy() default false;}1.2.3.4.5.6.7.8.9.10.11.@Import
在@Import中我们可以配置需要导入的配置类,有以下几个选择:
直接导入@Configuration标识的类导入实现了接口ImportBeanDefinitionRegistrar的类,来向容器注册BeanDefinition导入实现了接口ImportSelector的类(不需要@Configuration)来选择配置 复制@Import(AspectJAutoProxyRegistrar.class)1.ImportBeanDefinitionRegistrar
在上面@EnableAspectJAutoProxy注解上,通过@Import,引入了AspectJAutoProxyRegistrar,服务器租用而该类又实现了接口ImportBeanDefinitionRegistrar, 该接口能够通过BeanDefinitionRegistry向Spring容器注册我们期望的BeanDefinition,看代码:
复制class AspectJAutoProxyRegistrar implements ImportBeanDefinitionRegistrar {@Override
public void registerBeanDefinitions( AnnotationMetadata importingClassMetadata, BeanDefinitionRegistry registry) { AopConfigUtils.registerAspectJAnnotationAutoProxyCreatorIfNecessary(registry); AnnotationAttributes enableAspectJAutoProxy = AnnotationConfigUtils.attributesFor(importingClassMetadata, EnableAspectJAutoProxy.class); if (enableAspectJAutoProxy != null) { if (enableAspectJAutoProxy.getBoolean("proxyTargetClass")) { AopConfigUtils.forceAutoProxyCreatorToUseClassProxying(registry); } if (enableAspectJAutoProxy.getBoolean("exposeProxy")) { AopConfigUtils.forceAutoProxyCreatorToExposeProxy(registry); } } }}1.2.3.4.5.6.7.8.9.10.11.12.13.14.15.16.17.18.19.20.这里我们可以拿到@EnableAspectJAutoProxy的元数据以及对应的属性配置,这样就可以基于开发者的配置实现不同逻辑
ImportSelector
上面说到了,@Import还可以配置实现了ImportSelector接口的类,进而控制具体需要使用的Configuration,下面是@EnableAsync中@Import配置的类
复制public class AsyncConfigurationSelector extends AdviceModeImportSelector<EnableAsync> { private static final String ASYNC_EXECUTION_ASPECT_CONFIGURATION_CLASS_NAME = "org.springframework.scheduling.aspectj.AspectJAsyncConfiguration";@Override
@Nullable
public String[] selectImports(AdviceMode adviceMode) { switch (adviceMode) { case PROXY: return new String[] {ProxyAsyncConfiguration.class.getName()}; case ASPECTJ: return new String[] {ASYNC_EXECUTION_ASPECT_CONFIGURATION_CLASS_NAME}; default: return null; } }}1.2.3.4.5.6.7.8.9.10.11.12.13.14.15.16.17.18.ImportAware
同样和@Import配合使用,针对基于ImportSelector选择的Configuration,只要实现了ImportAware接口,就可以拿到@Import对应@Enable注解的元数据
复制@Configuration
public abstract class AbstractAsyncConfiguration implements ImportAware {@Override
public void setImportMetadata(AnnotationMetadata importMetadata) { this.enableAsync = AnnotationAttributes.fromMap( importMetadata.getAnnotationAttributes(EnableAsync.class.getName(), false)); if (this.enableAsync == null) { throw new IllegalArgumentException( "@EnableAsync is not present on importing class " + importMetadata.getClassName()); } }}1.2.3.4.5.6.7.8.9.10.11.12.13.上面主要根据Spring源代码中的例子,了解@Enable、@Import、ImportBeanDefinitionRegistrar、ImportSelector、ImportAware如何搭配使用, 从而实现Spring的动态配置,用一张关系图表示:
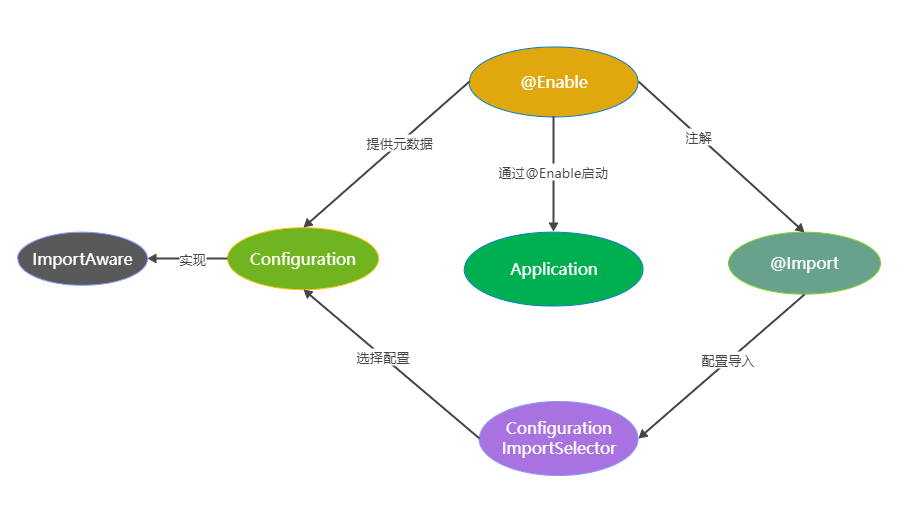
relation
spring-boot-configuration-processor
我们知道SpringBoot的配置我们都会写在application.yml(.properties)文件中,为了简化配置工作,如果能有智能提示就好了。这不,别人也想到了。只用这样做:
现在只需要在项目中引入依赖: 复制<dependency> <groupId>org.springframework.boot</groupId> <artifactId>spring-boot-configuration-processor</artifactId> <optional>true</optional></dependency>1.2.3.4.5. 定义一个Properties文件复制@Data
@ConfigurationProperties(prefix = "myProp")public class MyProperties { private Boolean enable; private String name;}1.2.3.4.5.6. 在Configuration中导入复制@Configuration
@EnableConfigurationProperties({MyProperties.class})public class WebApiAutoConfiguration {}1.2.3.4.5. 打包 复制mvn clean install1. 生产metadata.json 可以看到,在jar中的/META-INF目录下多了一个spring-configuration-metadata.json文件@Conditional
实现spring bean的可插拔,我们可以基于属性、配置、类或者Bean来控制配置(@Configuration)是否生效,常见的有下面的这些:
ConditionalOnBean 容器存在Bean时配置有效ConditionalOnClass classpath中有指定class时配置有效ConditionalOnMissingBean 容器不存在Bean时配置有效ConditionalOnMissingClass classpath中没有指定class时配置有效ConditionalOnProperty 属性配置对应值成立时配置有效AutoConfigure和@Enable
AutoConfigure是在spring.factories中配置了就会加载,但是可以通过@Conditional让配置中的Bean不生效;@Enable需要显示地使用才能有效,且先于AutoConfigure生效,从而可以配合@Conditional来阻断AutoConfigure的配置
由于Spring官方文档对框架的介绍可以说是编程届最为详尽的,我们可以通过阅读其文档解决大部分开发中遇到的相关问题。
(责任编辑:应用开发)


